Dinner
>
50ct or 125ct Totino’s® Pizza Rolls
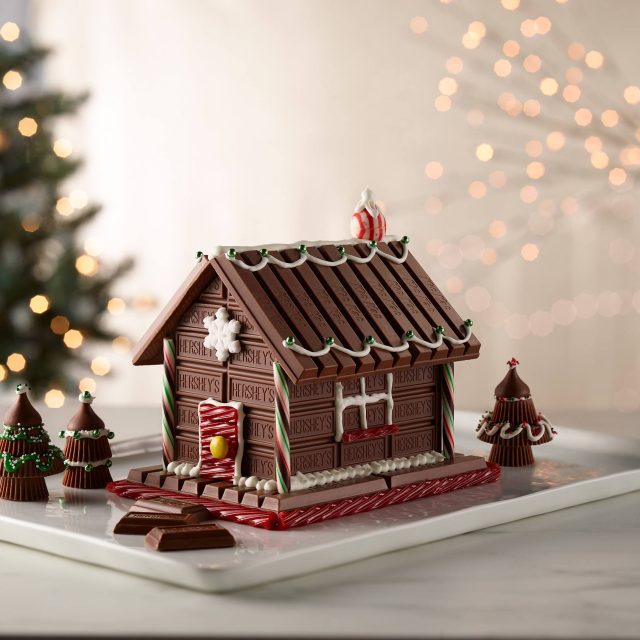
Candy Cabin
>
5 - 6 (4.4 oz each) HERSHEY´S Milk Chocolate Bars, divided
>
9 (1.5 oz each) KIT KAT white or Milk Chocolate Bars, divided
>
Heavy-duty (freezer) food storage bags
>
Small wrapped candies (optional)
>
ROYAL ICING (recipe follows)
>
Assorted HERSHEY'S Candies for decoration
>
Powdered sugar
Royal Icing
>
2 1/2 cups powdered sugar
>
1 tbsp meringue powder (pasteurized dried egg whites)
>
3 tbsp warm water
Dinner
1
Follow directions on the back of the package to get the Totino’s Pizza Rolls cooking. Once complete, snack while you build!
Candy Cabin Activity
1
Remove wrappers from 5 HERSHEY'S Milk Chocolate Bars. Always have chocolate bars positioned so that you can read the word "HERSHEY'S" left to right. Follow directions in Steps 2 and 3 to make parts for constructing the house.
2
Make house ends by cutting 1 bar in half making 2 squares of 8 sections; cut house sides by cutting large rectangle (3 sections across and 4 sections high) from 2 bars. Set aside remaining rows of chocolate sections to be used for top floor of house.
3
Cut 1 bar and a portion of second bar into 5 chocolate pieces that are each 2 sections across and 2 sections high. (Put aside remaining portion of remaining bar.) Make 2 house gables and 3 roof trusses by cutting each from top center point of piece down to the lower right and left
corners to make triangles. (If pieces break they can be glued back together with melted chocolate.) Save the remaining chocolate from trimming the gables and trusses for melting to "glue" house sections together.
4
Place piece of wax paper on counter. Place the 2 house ends on wax paper so that the writing is down and would read left to right if flipped. Place gable and truss trimmings in small heavy-duty (freezer) food storage bag. Microwave at MEDIUM (50%) 30 seconds; knead
chocolate and bag. If necessary, microwave bag at MEDIUM an additional 10 seconds at a time, kneading bag and chocolate after each heating, until chocolate is melted and smooth. Clip off one corner of bag about 1/4 inch from point; pipe melted chocolate on top edge of
each house end; attach gable. Lay flat on wax paper until firm (about 20 minutes).
5
Remove wrappers from 4 KIT KAT Bars. "Glue" bars together with melted chocolate to form flat base for house. Allow to firm.
6
Pipe melted chocolate along bottom edge of one house side; position on house base formed earlier. Prop lightweight boxes against house side so that it remains upright until chocolate has firmed.
7
Pipe melted chocolate along both end edges of attached house side. Reheat chocolate, as needed. Pipe melted chocolate along bottom edges of both house ends and position against melted chocolate on house side already in position. Pipe melted chocolate along both vertical
edges and bottom edge of remaining house side. Slide into position so that you have completed upright box for house. Allow chocolate to firm.
8
At this point the interior of the house can be filled with wrapped candies, if desired.
9
Place the 2 reserved chocolate rows from cutting house sides on cutting board. Cut 2 more pieces (1 section across and 4 sections high) from remaining unwrapped chocolate bar; place on cutting board. Cut off 3 of the sections after the second letter "E" in HERSHEY'S and the
remaining section after the first letter "S". (Save extra chocolate and trimmings for additional melted chocolate needed for attaching parts together.*)
10
Pipe melted chocolate along top edge of house sides. Add floor and trusses by placing 1 of the larger rectangles against the end gable. Place truss against side of "board" and then position another larger rectangle. Repeat adding trusses and floor boards ending with narrower "board" against front truss. Allow to firm.
11
Remove wrappers from remaining 5 KIT KAT Bars. Cut 1 bar in half so that you have 2 two-finger sections. Pipe melted chocolate on edges of tresses, gables and top edge of house sides. Position 2-1/2 bars on each side of house to complete roof. Allow to firm.
12
Prepare ROYAL ICING. Decorate house as desired with prepared icing and attach candy decorations. Use icing to "glue" candies to house. Allow icing to harden. (If you don't like the design or parts of the design, wait until the icing has hardened and then you can remove without damaging the house.) Dust house roof with powdered sugar. Store decorated house incool, dry place.
Royal Icing
1
Stir together 2-1/4 cups powdered sugar and 1 tablespoon pasteurized dried egg whites (meringue powder). Add 3 tablespoons warm water. Beat at medium speed of electric mixer until spreadable. Add additional water, 1 teaspoon at a time, if too thick. Divide icing into small bowls for each color desired and tint with food colorings. Transfer icing to pastry bags with desired tip. Cover icings and tips of pastry bags with damp paper towels to keep icing from drying out. (Some garnishes may need a firmer icing to hold their shape. Stir in small amounts of additional powdered sugar to get the desired consistency.) 1 cup icing.


Comments
Recipe provided by Hersheyskitchens.com